

Scott
BattleLore is a 2-player game in which medieval armies clash across a battlefield. The mechanics for this game were created by Richard Borg and used in his games Battle Cry by Avalon Hill and the Command and Colours games by GMT, and then used in Memoir ‘44 by Days of Wonder. If you have played any of those, then you have the idea of how BattleLore works as well. We are playing the 1st edition, by Days of Wonder. A second edition was released by Fantasy Flight Games.
The premise is that you are refighting historical medieval battles between French and English armies, using units of infantry and cavalry. A unit occupies a hex and may be of several types. Infantry units have four figures in a unit and cavalry have three, including a banner which denotes more specifically their unit type. There are two types of banner, a standard banner and a pennant banner, which you use to identify which units belong to which army, as they all use the same figures and colours. A red banner denotes heavy troops, a blue banner is a medium troop, a green banner is a light or inexperienced troop, and a Bruce Banner is the Hulk (not appearing in this game),
The level (banner colour) of the troops indicates how far they can move and fight when activated. That is, the lighter troops can move further, but roll fewer dice to attack with.

The troops that each player starts with is dictated by the scenario, all of which are laid out in the Adventures book. This is a great way to get into the game, as the first few adventures are pretty basic, but more special rules and troops get added in as you go through them in order. In this way the book acts as a series of “tutorials” to get you playing without being overwhelmed with complexity. And looking at the pieces we didn’t use, it looks like there is a lot of complexity later on!
The first scenario is Agincourt, and as I let Connor be the English (since I happened to align the board on the table so he was on the English side), I didn’t feel good about my chances of winning this one.
Each player is also told how many Command cards to draw from the deck, and this amount differs depending on the scenario. In this one, the English get six, and the French get four. Or quatre. I sense that the scenario is more about historical accuracy than equal chance of each player winning.
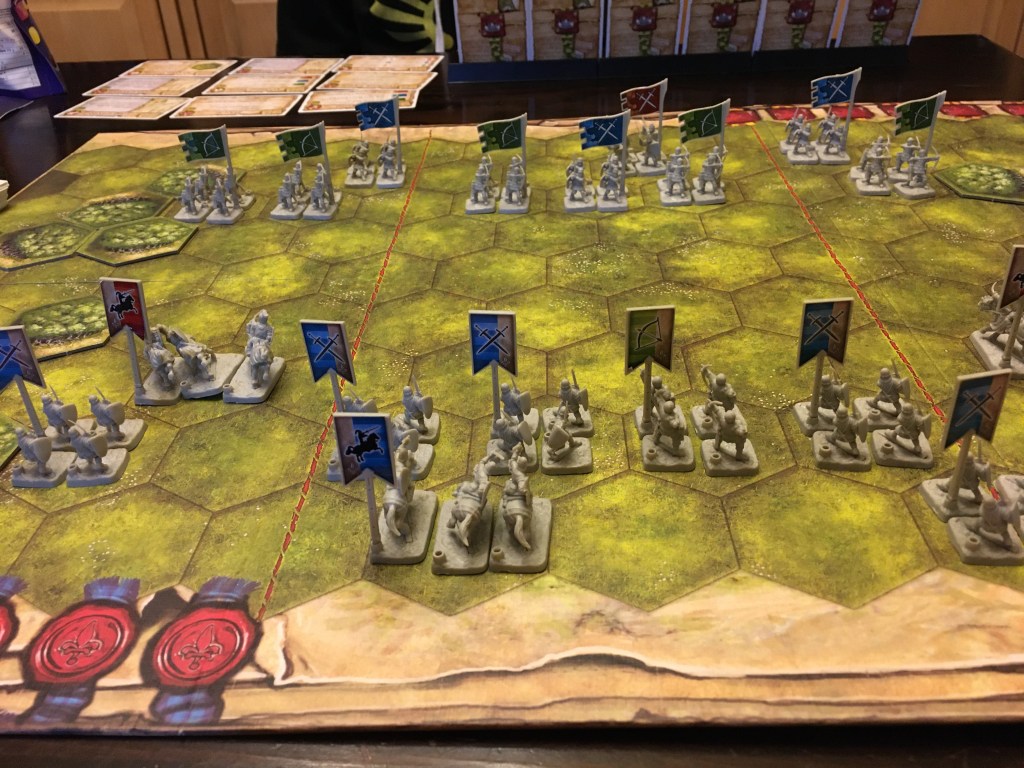
The Command cards are what players use to activate and fight with their units (referred to as “ordering”). Each turn a player plays one card, which allows them to order some units to move and fight. The board is broken into three sections: the centre, the left wing and the right wing (marked by two dotted red lines). The Command cards indicate how many units can be ordered and in which section. For example, a card might say “Patrol: Order one unit in the centre”, or “Attack: Order three units on the left wing”. Some allow you to order a unit in each section, such as the “Advance” card. There are some other special cards with different effects you can use as well.
Once the player has chosen which card to play, they move all of the units they are ordering. Once they have moved they can then fight. There are handy reference cards to remind you how far each unit type can move and how many dice they roll when fighting.
As befits the scenario, Connor’s English had many units of archers and I had only one. I did get two units of heavy cavalry though. After a couple of initial turns with Connor peppering my units with a bit of archery fire and me moving my heavy cavalry into a position to charge, Connor played the Command card “Darken the Skies”, which allows the player to shoot twice with each of their archery units. This card randomly appears in the deck, and I could have gotten it, but he started with it, which sucks for me, but I guess fits the scenario. Anyway, he shot a bunch of my troops to death.

In order to win the scenario, a player needed to collect 4 Victory Banners from the opposing player. When troops are killed and removed for a unit, the banner is always the last casualty to be removed. So when this figure is removed, we just hand it to the opposing player to place on their side of the board to indicate they have eliminated a unit and captured a banner.

Combat is done through dice. Once units have moved, if they are eligible to attack, they roll the number of dice appropriate to that unit. Each die has six different symbols for results. There is a side with a blue helmet, one with a red helmet and one with a green helmet. These indicate that a hit has been made against a unit if the target unit’s colour matches the colour of the face and one figure is removed from the unit. There is also a side with a black flag which indicates that the target unit retreats one space back toward its own side for each flag that is rolled. If the unit can’t move back because it is blocked by another unit or impassable terrain, then another figure is lost from the unit. This makes positioning of your own units important, but also means if you can get units behind your opponent, you can cut them off from retreat, potentially causing more damage to a unit. There is also an orange symbol with a sword which means a hit against any unit, as long as the attacking unit is equipped with a weapon that allows this. For example, foot units have short swords which score hits on the orange side, except against cavalry. The final side has shiny purple diamonds on it, which give a Lore effect, unless you are playing a scenario which doesn’t use Lore effects, in which case it means you just missed and don’t cause any damage.
If a unit retreats out of its space or is wiped out, the attacking unit may “Gain Ground” and move into the space the defending unit previously occupied. An advantage of cavalry units is that they can do this move, then move an additional space and attack again.
I used this to pretty good effect in our second game, pushing a cavalry unit through Connor’s lines before it got beaten up and I lost the game.

This is a good strategic game with a lot of visual appeal. There is the randomness of the cards you draw and how your dice rolls go, but with the terrain effects, you have a lot of options to think about, and how to use what you have most effectively. How you manoeuvre is important, especially since any unit that is in contact with two friendly units is considered “Supported” and gets bonuses, such as ignoring the first flag result rolled, and also being able to attack back against an attacker if they aren’t wiped out or pushed out of their space by the initial attack. This means choosing where to attack is also important, as it is better to try to pick off units on the end of the line, or unsupported units than charge into the centre of the enemy line.
I am looking forward to working through the Adventures book to try the other scenarios, as they include mercenary fantasy units such as dwarves and goblins, monsters, and also magic. I also hear that there are a lot of expansions with more unit types.
We played two games in an evening, even after going through the rules and familiarizing ourselves with the pieces. Now that we have done that, setting up and starting will take less time, making it easy to play more than one scenario each time. Of course, we had the benefit of being familiar with the system, having played Command and Colours and Memoir ‘44 previously.
Rhiannon wasn’t particularly interested in playing this one, until she came by the table toward the end of our second game, and is now asking questions and looking more interested in trying it.
I feel that BattleLore finds a good balance of being unit level combat without being a long sprawling Risk-like slog, or being as freeform or hobby-driven like Warhammer. Also, the turns are short as play goes back and forth between players quickly, and if a supported unit gets attacked, it can fight back, meaning you can have something to do on your opponent’s turn. This is definitely recommended for anyone who wants to play a strategic battle game.
Connor
I had quite a lot of fun with Battlelore, like Command and Colours before it. The first game very much handed me the victory, with twelve attacks in a turn where three is on the high end of normal, though it was very thematic given Agincourt’s history. The second scenario was a lot more interesting for me, with our forces being matched and no instant-win card. In it I started by dealing the damage I wanted on the flanks and then concentrating my forces in the center. That was a double-edged sword, as while it made me harder to attack and gave me more power offensively, it also quickly ran me out of usable cards. Fortunately, my gambit paid off, and I managed to kill enough units with a combination of solid lines and hit-and-runs in the hills against his powerful units before I ran completely out of cards. Scott did manage to do significant damage with a powerful cavalry charge that broke through my lines, but I was able to close them up again and drive the cavalry to their deaths before he was able to capitalize on it and win.
All-in-all I found it to be very fun, and am greatly looking forward to playing more, especially with some of the more magical elements.
Leave a Reply